Alright lets do a quick recap. If you haven’t already, I suggest you to read the first part here. In the previous post we made an app which fetches and displays GitHub issues using android architecture components library. Our app follows Google recommended architecture pattern as was described in the Google I/O 17. We divided our app into the following layers for better code responsibility and separation of concerns:
- View/UI layer
- ViewModel layer
- Repository layer
- DataService layer
In this part we will use Dagger 2 to add Dependency Injection to our app. So let’s get started.
Let’s Begin
But hold on, you may ask what is Dependency Injection and why should we use it in our app? Good question. First, lets define the word “dependency”.
Dependency:
When one component componentX of an application depends on another component componentY, then we say componentX has a dependency on componentY.
As an example if we look into our own app’s classes ListIssuesViewModel and IssueRepository, we see they have composition relationship or HAS-A relationship as in ListIssuesViewModel HAS-A IssueRepository. Hence we can say ListIssuesViewModel has a dependency on IssueRepository. Now we know what a dependency is, let’s move on to understand dependency injection.
Dependency Injection or DI:
Dependency Injection is a technique to “inject” or supply the dependencies of an object from outside. This means an object creating its dependencies via
newoperator is strictly prohibited.
Dependency Injection initially appears to be more complicated than it actually is. The first time read about it, I almost didn’t get it. But with a simple example I got the idea behind it. Let’s take an example from our issues app.
Dependency Injection Example
Without DI: Here is the simplified version of sample code that we wrote in the first part of the post:
public class ListIssuesViewModel extends ViewModel {
  private IssueRepository mIssueRepository;
  // Other member declarations


  public ListIssuesViewModel() {
        mIssueRepository = new IssueRepositoryImpl();
    	// Other code

    }

  // Other code

}
Notice that the class ListIssuesViewModel obtains its dependency of type IssueRepository by instantiating its implementation class IssueRepositoryImpl class using new operator.
With DI: The above class when refactored to follow DI would look like this:
public class ListIssuesViewModel extends ViewModel {
  private IssueRepository mIssueRepository;
  // Other member declarations


  public ListIssuesViewModel(IssueRepository repository) {
        mIssueRepository = repository;
    	// Other code

    }

  // Other code

}
Important thing to observe is how object of type IssueRepository is supplied to class ListIssuesViewModel via the constructor. This technique is known as constructor injection.
Note: IssueRepository is an interface. It acts like a contract between ListIssuesViewModel and IssueRepositoryImpl. More on this later.
Dependency injection works well with Dependency Inversion principle. Dependency Inversion Principle is one of the five SOLID principles, which in simpler words says:
Higher order modules (which encapsulate business logic) should not depend directly on lower order modules (which are actually responsible for low level operations like making database calls, or access disk storage). Instead, they should depend on abstractions.
This is the reason why we have IssueRepository interface in our app, so that the ViewModel class only interacts with the actual implementation class IssueRepositoryImpl via interface as a contract. This prevents tight coupling between the two classes thus making the code more modular, testable and easier to maintain. The below diagram will probably make it more clear. We are using pattern similar to figure 2 in the below diagram.
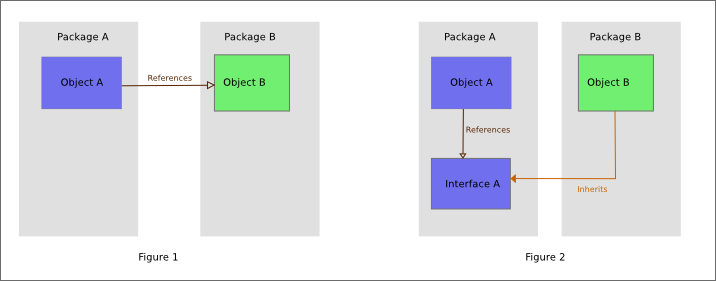 Image source : Wikipedia
Why use Dependency Injection
Although it seems overkill in our simple app, DI becomes quite useful as the codebase becomes larger and eventually manually injecting dependencies become painful and error prone. However we will still go ahead and implement DI in our app for the sake of understanding.
This leads us to another question: OK, how do we solve this problem? Here comes Dagger 2 to the rescue. Dagger is the DI framework and library for java apps.
Advantages of using Dagger includes but not limited to:
- sharing dependencies across different modules.
- Better testability, easier unit and integration tests.
- Less code coupling, hence better code maintenance.
- Scoped instances.
Enter Dagger 2
Lets see how we can implement DI in our app using dagger 2. The main constructs of dagger 2 are:
-
Modules - Modules are the providers of the dependency being requested. To tell dagger that a particular class is a Module we annotate it with
@Moduleannotation. Module class contains methods annotated with@Providesannotation which actually provide the dependencies when requested by other parts of the code via dagger. Modules encapsulate the logic of how to create the dependency objects. -
@Inject- Annotating a field or constructor with@Injectannotation indicates that part of code is participating in dependency injection. Annotating a non private field with@Injectannotation indicates to dagger that dependency is being requested there. Annotating a constructor with@Injecttells dagger to use that constructor to instantiate the class. Dagger also supports field injection, but constructor and field injections are most widely used. -
Components - Component interface is like an intermediate that connects the dependency providers (Modules) with the dependency requestors (
@Injectproperties). In component interface we mention which modules to fetch dependency from and specify which parts of the code would require DI using field or method injection. To create a component, we annotate the interface with@Componentannotation. Dagger will generate an implementation of this interface at compile time and the generated class would create the dependency graph. The generated class name will be interface name prefixed withDagger.
Check the references below to learn more about Dependency Injection and Dagger.
Time to code
We will use Dagger to supply the following classes as dependencies in appropriate places: GithubApiService, IssueRepositoryImpl and ListIssuesViewModel and ViewModelFactory.
First, add the latest version of dagger 2 (currently 2.11 at the time of writing) dependencies to your app level build.gradle file
compile 'com.google.dagger:dagger:2.11'
annotationProcessor 'com.google.dagger:dagger-compiler:2.11'
Lets begin by creating our module class.
@Module
public class AppModule {
    public static final String BASE_URL = "https://api.github.com/";

    @Provides
    @Singleton
    GithubApiService provideGithubApiService() {
        return new Retrofit.Builder()
                .addConverterFactory(GsonConverterFactory.create())
                .baseUrl(BASE_URL)
                .build()
                .create(GithubApiService.class);
    }

    @Provides
    @Singleton
    IssueRepository provideIssueRepository(IssueRepositoryImpl repository) {
        return repository;
    }

    @Provides
    ViewModel provideListIssuesViewModel(ListIssuesViewModel viewModel) {
        return viewModel;
    }

    @Provides
    ViewModelProvider.Factory provideListIssuesViewModelFactory(
            ViewModelFactory factory
    ) {
        return factory;
    }

}
Note the annotations used in the above class, @Module and @Provides have been discussed above. @Singleton annotation ensures the class instance as singleton across the dependency graph. We will instantiate our dependency graph in Application class and this will ensure the instances of GithubApiService and IssueRepository will be singleton throughout our app.
Next we’ll create our Component.
@Singleton
@Component(modules = {AppModule.class})
public interface AppComponent {

    void inject(MainActivity mainActivity);

}
Notice how we specify the modules to be used with the component inside @Component annotation. The method void inject(MainActivity mainActivity) tells dagger that we will be requesting field or method injection in MainActivity class.
Next we’ll make some changes in IssueRepositoryImpl and ListIssuesViewModel to support the DI.
public class IssueRepositoryImpl implements IssueRepository {
    @Inject
    GithubApiService mApiService;

    @Inject
    public IssueRepositoryImpl() {
    }

    // Other code remains unchanged ...

}
@Inject annotation on field mApiService tells dagger that it is requesting dependency of type GithubApiService to be injected. This is the example of field injection.
And @Inject above the constructor indicates Dagger to use this constructor to create instances of IssueRepositoryImpl using this constructor when the dependency is requested. Doing so also adds this class to Dependency graph.
public class ListIssuesViewModel extends ViewModel {

    private MediatorLiveData<ApiResponse> mApiResponse;
    private IssueRepository mIssueRepository;

    @Inject
    public ListIssuesViewModel(IssueRepository issueRepository) {
        mApiResponse = new MediatorLiveData<>();
        mIssueRepository = issueRepository;
    }

   // Other code remains unchanged ...

}
Here everything is similar as described above, but the only thing to point out is that because the constructor annotated with @Inject have a parameter of type IssueRepository Dagger will try to supply this dependency as long is also exists in the Dependency graph.
All seem to be good so far. But we have a situation that needs attention. In the previous post we briefly mentioned that if a class extending ViewModel class has a non empty constructor we would have to write a factory class which would implement android.arch.lifecycle.ViewModelProvider interface. This factory class class would be responsible to instantiate our ViewModel class.
public class ViewModelFactory implements ViewModelProvider.Factory {
    private ListIssuesViewModel mViewModel;

    @Inject
    public ViewModelFactory(ListIssuesViewModel viewModel) {
        this.mViewModel = viewModel;
    }

    @Override
    public <T extends ViewModel> T create(Class<T> modelClass) {
        if (modelClass.isAssignableFrom(ListIssuesViewModel.class)) {
            return (T) mViewModel;
        }
        throw new IllegalArgumentException("Unknown class name");
    }
}
In the above code we add ViewModelFactory to the dependency graph and dagger will handle injection of ListIssuesViewModel in this class. In the create() method we return the obtained instance of ListIssuesViewModel.
Next we’ll create IssuesApplication class which we will use to initialize dependency graph for our app using Component.
public class IssuesApplication extends Application {
    AppComponent mAppComponent;
    @Override
    public void onCreate() {
        super.onCreate();
        mAppComponent = DaggerAppComponent.builder().build();
    }

    public AppComponent getAppComponent() {
        return mAppComponent;
    }
}
Don’t forget to add property android:name=".IssuesApplication" to the <application> tag in AndroidManifest.xml file.
Finally we make changes to our MainActivity.java file:
public class MainActivity extends AppCompatActivity {

    @Inject
    ViewModelProvider.Factory mViewModelFactory;
    // Other fields


    @Override
    protected void onCreate(Bundle savedInstanceState) {
        super.onCreate(savedInstanceState);
        setContentView(R.layout.activity_main);
        // Required by Dagger2 for field injection

        ((IssuesApplication) getApplication()).getAppComponent().inject(this);
        mViewModel = ViewModelProviders.of(this, mViewModelFactory).get(ListIssuesViewModel.class);

        // other code remains unchanged ...

    }
}
In above code we first get the reference of our component DaggerAppComponent from the Application class and inject the MainActivity so that it can take part in dependency injection. ((IssuesApplication) getApplication()).getAppComponent().inject(this) is necessary here since we don’t have control over the creation of MainActivity (hence we can’t use constructor injection technique), so this is how we ask dagger to include it into our dependency graph. This enables us to inject our ViewModelFactory here and supply it to ViewModelProviders.of() method, which tells architecture components library to get the instance of ListIssuesViewModel.class from our factory class.
So now we have Dependency Injection implemented in our app. I hope that I am able to get you started with the idea of DI and highlighted the reasons to use it. If you have any doubt or any suggestions for improvement or errors, feel free to reach me out.
The full code for this tutorial can be found in GitHub repository in branch named “mvvm_part2_di” . And don’t forget to star the repo.
References
- YouTube video by Gregory Kick: DAGGER 2 - A New Type of dependency injection
- YouTube video on DI by Dan Lew: Dependency Injection made simple
- Dagger 2: official page
- Codepath: tutorial on Dagger 2
- And last but not the least, Google’s excellent: sample app for architecture components demo on GitHub